The World On Canvas
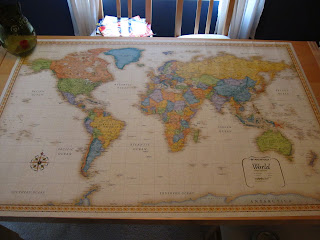
Lately I have been wanting to do artsy projects, call myself artsy, and hope people believe I really am... artsy. Pinterest has been amazing, in that I can find fun and easy home projects, pin them to my craft board, and then attack them when I have a free day. Well today was 'do something creative with a map' day. I have always wanted a world map in my home, but I hate using thumb tacks, and who wants to have a poster continuously falling down because the sticky putty you are using is useless. (Ahem, Marcos, I'm talking to you.) And because I want a GIANT world map, buying a frame for it is out of the question, as they are too expensive. Luckily, I found this project by Creative Juices Decor on Deedra's pinterest board. Canvases and Mod Podge? I'm in. I bought a brand new, though antique looking, world map at Barnes and Nobles and went to work.
Seven hours later, with a sore neck, glued fingers, a trip back to the book store for a replacement map, I finished my work.
 |
| This is the map I used. |

On the Creative Juices Decor blog, the artist traced out the canvases to mark where to cut on the map, but I had issues with the tracing. I did this with the first map, but found that my lines were all over the place, and when I cut out the first 8 x 10, I realized that I would be cutting out parts of the map if I continued cutting where I drew lines. My canvases were super cheap and all a little different, even though they were officially 8x10's, and 16x20's, but I'm sure this was part of the problem. I'm a perfectionist and needed exact measurements. So instead, I measured the top of the canvas where I would want the map to lay and then using those measurements, made lines of where to cut on the map.
 |
| Measuring where the map would lay. |
 |
| Using a ruler, drawing lines showing where to cut from those measurements |
 |
| I used Photo Mounting Spray, and ended up only using the Mod Podge on the left, for paper, matte finish. |
Once I glued the map to the canvas, I put a layer of Mod Podge over it. I found that the paper bubbled really bad. I almost panicked until I found that the photo mounting spray really is not that sticky and I was able to pull up the map and then flatten it back down. This was the hardest and longest part of this project. First mod podging, then pulling the map back up, flattening it out again and mod podging more. (Is mod podging a word?) I had glue all over my fingers, but this process seemed to really help the bubbling. I had noticed a comment on the Creative Juices Decor blog where someone had that same problem. I think with a laminated map or any non paper map, you wouldn't have the bubbling.
 |
| I took some pictures this morning of it in the light. I also noticed that it needs another layer of Mod Podge! |
Thank you to Creative Juices Decor for your awesome creativity and ideas! I am so thankful for your "artsy" brain.....cause lets be honest, I am not artsy.
UPDATE: I am back in Skagway and it's up on the wall!!
TA DAH!!!!!
UPDATE: I am back in Skagway and it's up on the wall!!
TA DAH!!!!!


Comments
Thank you for sharing!
Thanks,
Rhonda
By the way, what color spray paint did you use?
Thank you for sharing!
Bridget
Thanks,
Poonam
It did bubble a little, but nothing too bad. I wouldn't suggest laminating it first.... Mod Podge doesn't work well over laminate. My first attempt was with a map that had a tiny bit of laminate to it, and it didn't work at all!! You can always mod podge the bubbles back down over time if needed. But again, my map is still hanging and I get compliments on it all the time!
wall map of the world